Streamline Your Workflow: Automate GitLab Releases with Semantic-Release
Maximise Your Development Time: Learn How to Automate GitLab Releases with Semantic-Release
Each week one of my new team makes a release and deployment of our API service from our GitLab repository. It is a very manual process that involves working out what has changed in the previous commits, determining what sort of version it should be, tagging it in GitLab, and running a GitLab pipeline to deploy it to the correct server. It's a tedious process that can be prone to human error.
On a previous project, I'd used a tool called semantic-release in combination with conventional commit messages to automate the process. This gave a quick and easy release process without any human interaction. I love automation so it felt like the perfect tool for the job.
What is a release?
A release will depend on your stack of choice and platform. For a desktop application, you could be taking the latest code, compiling the code, and creating an executable file. For web applications, this is often an update of a release number and re-deploying the application to your servers.
Our team creates a Node.js API that is consumed by multiple desktop and mobile clients. A release for us is a git tagged release which is then deployed to our development, QA, or production environments. We also bump our Node package.json version number, although as we're not versioning a library, this isn't strictly necessary.
Version numbers in the Node.js ecosystem use the standard semantic versioning (also known as SemVer). This gives us a release number in the format of major.minor.patch. A major version is determined by a breaking change, for example, the API makes incompatible changes. A minor version is generated if new functionality is added but the functionality is backwards compatible with previous releases. Finally, a patch version is changed if any bug fixes are made.
So how do we determine when to change the version number? This is up to the development team to think about the changes that are made. However, we can infer it automatically if the team uses consistent git commit messages.
Conventional Commits
The conventional commits specification is a lightweight convention that can be adopted for commit messages. It provides you with an easy set of rules to follow to create consistent commit messages. This allows automated tools to parse the git messages to determine a semantic version number.
A commit message is structured in the following way:
type(optional scope): description of commit

[optional body]

[optional footer]
For example:
feat(user): add validation schema on user create endpoint
Now we have a consistent format for our commit messages, how do we ensure that the team sticks to it?
For this, we can look at a tool to lint the commit messages before anyone is allowed to commit their code. A tool called commitlint can be used to validate commit messages. We can also use the husky package to add automated git hooks to the project. With this, a git hook can be added which will lint the commit message to our standardised format before the code is committed to our project.
Assuming you have a Node.js project set up, commitlint can be installed like this:
# Install commitlint CLI
npm install --save-dev @commitlint/cli
Although commitlint allows you to validate against a variety of commit message formats, including your configuration, we chose to use the config-conventional configuration which adheres to the conventional commit message format. You can install it as follows:
# Install conventional config for commitlint
npm install --save-dev @commitlint/config-conventional
Now you can set up the commitlint configuration file called commitlint.config.js so it uses the config-conventional message format:
echo "module.exports = { extends: ['@commitlint/config-conventional'] };" > commitlint.config.jsNow we've set up commitlint, we can ensure that it gets called when we attempt to commit code into git. We can install husky and add a commit-msg hook:
# Install Husky
npm install husky --save-dev

# Activate Husky git hooks
npx husky install

# Add the commit-msg hook
# It runs commitlint with the given commit message
npx husky add .husky/commit-msg 'npx --no-install commitlint --edit $1'
Now all commit messages must adhere to the config-conventional commit format and git will fail to commit any code that has messages that don't validate.
The team should now all be using the same commit message format so we can use that with semantic-release to determine how we want to release.
Semantic Release
The semantic-release package automates your release workflow. It analyses the git commit messages, determines the next version number, generates release notes and a changelog file, and publishes the package for you.
By default, semantic-release has several plugins which are part of the main package. These allow you to automatically determine the release, update the version in package.json, deploy to the npm registry for public packages, and tag a release in GitHub. As my team has its code stored in a private GitLab repository, we need some additional configuration.
First, let's install semantic-release:
npm install --save-dev semantic-releaseWe want to create a CHANGELOG.md file that can be shared outside of the team, commit that file and the updated package.json to our git repository, and tag a release in GitLab. For this we'll need to add the following plugins:
npm install --save-dev @semantic-release/changelog @semantic-release/git @semantic-release/gitlabTo override the normal semantic-release configuration, we can add a releases key to our package.json and configure the additional plugins:
{
  ...,
  "release": {
    "plugins": [
      "@semantic-release/commit-analyzer",
      "@semantic-release/release-notes-generator",
      "@semantic-release/changelog",
      "@semantic-release/npm",
      "@semantic-release/git",
      "@semantic-release/gitlab"
    ]
  },
  ...
}
Determine when a release should be created
Once semantic-release is set up correctly, it will use its commit-analyzer plugin to parse your commit messages and determine whether a new release should be created. By default, it creates a release when the following commit types are present in the commit message:
fixorperf- A fix or performance commit message will trigger a new patch releasefeat- A feature commit message will trigger a new minor release- If
BREAKING CHANGEis written in the commit message, it will trigger a major release.
These defaults can be changed by adding additional rules to commit-analyzer using the plugin configuration in your package.json. We found some issues with it not creating releases when we expected it to, so see the gotchas section for rules that we added.
GitLab pipelines
Now that the script and plugins are ready to determine when a new release should be tagged, it's time to set up a GitLab pipeline to do so.
How you do this will vary depending on your project's need. For our project, we first want to run our tests and linting jobs to ensure they all pass. After that, we can determine if we should create a release by running semantic-release. We only want to check this on our main branch so that we don't attempt to create a release for all branches pushed to GitLab which are used for merge requests. Finally, we have a deployment job that will run only if a new release has been tagged. This is our continuous deployment step.
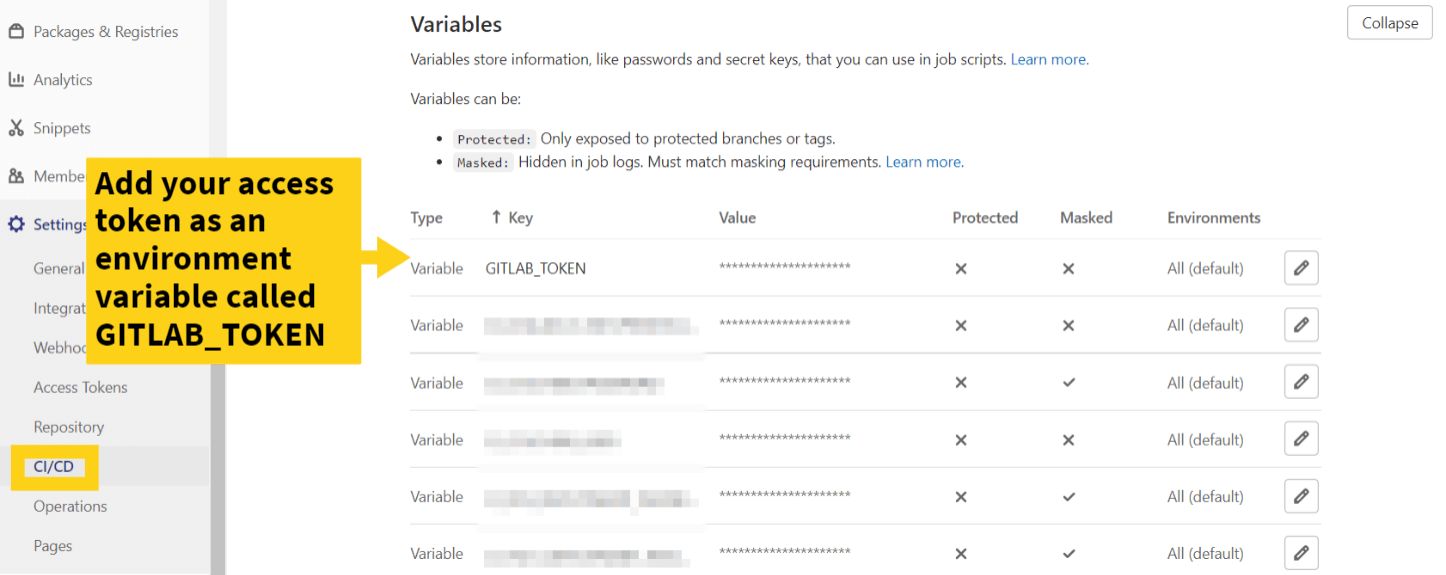
As we want to use GitLab's API to tag a release, we need to create an environment variable called GITLAB_TOKEN which is exposed to the pipeline. This will allow us to have write access to the API.
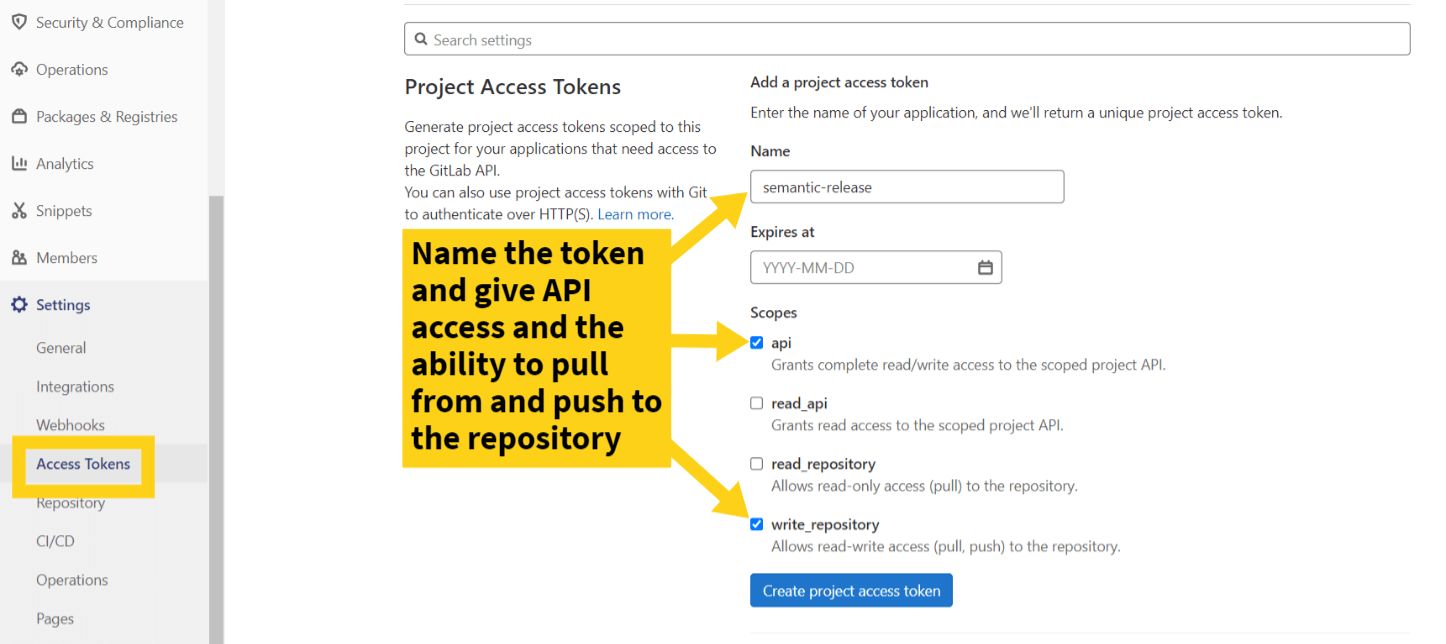
To do this you need to create a new access token in your project in GitLab by going to Settings -> Access Tokens. The access token will need read and write access to the API and also the ability to read and write to the repository. It should look something like this:

For security, your access token will only be shown once so copy the token ready to add it as an environment variable into your GitLab project.

Once the environment variable has been added to the pipeline, we can build the GitLab pipeline to use the access token with semantic-release.
Here's an example GitLab YAML pipeline:
# semantic-release requires optional chaining which
# appears in Node 14.5+
image: node:14.15

# Assuming we're:
# - running tests
# - creating a new release if applicable
# - deploying the release if applicable
stage:
  - test
  - release
  - deploy

# An example job to run the unit tests
run-unit-tests:
  stage: test
  script:
    - npm run test:unit
  tags:
    - <your-runner>

# An example job to run integration tests
run-integration-tests:
  stage: test
  script:
    - npm run test:integration
  tags:
    - <your-runner>

# A job to cut a new release
# This will run before our deployment
create-release:

  # This is part of the release stage
  stage: release

  # Only attempt to run this job when we merge to the main branch
  only:
    refs:
      - main

  # Expose the GITLAB_TOKEN environment variable to this job
  # as a GitLab variable to be used by semantic-release
  variables:
    GITLAB_TOKEN: $GITLAB_TOKEN

  # Execute semantic-release to create a new release
  script:
    - npx semantic-release

  # Add the runner that will execute this job
  tags:
    - <your-runner>

# An example deployment script
development-deploy:
  stage: deploy

  # Only run this job when a release has been tagged
  rules:
    - if: $COMMIT_TAG
      when: always
  script:
    - <your-deployment-script>
  tags:
    - <your-runner>
Using the above example GitLab pipeline, a new release will be created if your commit messages should update the version number when you merge your code to your main branch from a merge request.
Advantages of automatic releases
Using semantic-release to automatically generate your releases gives many advantages.
Moving towards consistent commit messages using commitlint allows the team to move towards smaller, more atomic pull or merge requests. This makes code reviews much easier as your team will gravitate towards less code for each branch.
The automatic generation of release notes and a changelog file allows you to automatically inform stakeholders by sharing a link to the latest release. It avoids the team having to perform git comparisons between commits to determine what has changed.
If you're publishing a library, the npm plugin allows you to automatically publish to the npm registry. No more manual steps to publish your latest and greatest work.
Note: If your project is marked as private in your package.json file, there will be no attempt to publish the application if you use the npm plugin. It will just be used to update your package.json version number.
It avoids the team having to think about releasing manually. This is often a job that happens daily or weekly and it now happens automatically. Ultimately, you'll start to see a faster release cadence with these smaller, atomic changes.
Gotchas
While using semantic-release has made life easier, there are some potential issues you might have to deal with.
Firstly, semantic-release claims to work with Node v10+. However, when I tried it in the GitLab pipeline, one of the plugins depends on a new JavaScript operator called the optional chaining operator. This only appears in Node 14.5 and beyond so make sure that any Docker containers, or the GitLab Node image you use, use Node 14.5 or later.
If you use the @semantic-release/git plugin, it will commit the changes in your CHANGELOG.md or package.json files to your repository. This git commit will trigger a new pipeline on your main branch, and hence this can start another pipeline to re-check the release.
Tagging a new version in git also causes an additional pipeline to trigger. Again, you may have to play with your pipeline jobs to avoid unnecessarily triggering another pipeline.
If you use the revert type commit message, it won't trigger a new release unless you use a git revert command or the message has This reverts commit <your-commit-sha>. If reverting code, you'd expect the version to be changed as functionality will have changed. Using the refactor type also doesn't trigger a new release. In theory, a refactor shouldn't change the functionality so it's understandable that it might not trigger the release. In practice, a refactor often needs to be deployed to sanity check that nothing has broken.
To fix both of these issues, you can add additional config to the commit-analyzer plugin to trigger release off the revert or refactor commit types.
In the example below, a revert type will trigger a new patch release and a refactor gives a new minor release.
{
  ...,
  "release": {
    "plugins": [
      [
        "@semantic-release/commit-analyzer",
        {
          "releaseRules": [
            {
              "type": "revert",
              "release": "patch"
            },
            {
              "type": "refactor",
              "release": "minor"
            }
          ]
        }
      ],
      ...
    ]
  },
  ...
}
Conclusion
Using sematic-release is a great way to take the stress out of your release process and help your team to move towards a continuous deployment process. Although this post mainly concentrates on a Node.js automatic release pipeline, the tools suggested could be used to create automated releases with other languages too.
Let me know if you have any questions or spot any errors.
Want to read more?

Automate Your Static Site Rebuilds with Netlify Scheduled Functions
Effortlessly automate regular website updates for your static site using Netlify scheduled functions. Set it and forget it - never worry about manual updates again!

Easily Create Gravatar Images With Eleventy
If you're moving your Wordpress site to Eleventy, you will want to convert your Gravatar images too. Find out how easy it is using an Eleventy shortcode.

You've got this: become a confident developer
If you're early in your software development career, you might not realise how good you are yet. Here are a few ideas to boost your confidence.

Writing great pull requests
Collaboration with other software developers is the key to great software. How do we make sure our code is merged into a project? By writing great pull requests.


